Monday, April 27, 2015

Wandering Weekend

Finding Unexpected Inspirations

I have to say, this weekend was pretty miraculous in unexpected inspirations.  To start the weekend off, I found a tiny mushroom growing in a potted plant on my kitchen window.  My daughter brought home a lemon seed one day and said, "Mommy can we plant this?" We took some soil from a leftover bag in the backyard, planted it, and put it in the kitchen window.  That was several weeks ago. Now in the pot we have a small seedling that sprouted and tiny mushroom. 


Tiny Mushroom and Seedling

The same day I was at my kitchen window again washing my hands.  I looked up and saw that a hummingbird had stopped at my window.  He fluttered in the rain while looking directly at me.  He was beautiful in his iridescent blue body and white round head.  His wings fluttered so fast that I couldn't even make them out.  By now I wish I could've gotten a picture of him fluttering there but sadly the moment passed as quickly as it came. 

Later that afternoon, I was walking to pick up my daughter from school.  I had reached the trailer where her classroom was. In a split moment I had stopped to look up because I heard a noise.  It was the brightest blue bird I had ever seen.  This blue did not remind me of a Blue Jay, so I'm not really sure what kind it was.  Plus I only got a good look at his body and not his head.  It was fluttering inside a section of the tin roof.  Then all of a sudden, it flew away as quickly as it appeared.

Saturday rolled around, and I was feeling pretty inspired by all the unexpected surprises from the day before. I headed over to do some serious art making with my artist friend and blogger, Jenny Ann Artist (jennyannartist.blogspot.com).  Every couple of weekends we get together and create without all the distractions of our everyday lives. During our creative time together, I finished the last of the three metal paintings from the photographs taken at the cabin (post called "Cabin Fever," some really great inspiration came out of that post, as well.)


Last Metal Painting, "Caterpillars and Cobwebs"

2nd Metal Painting Finished, "Chains"

One last bit of inspiration from this weekend, JennyAnnArtist introduced me to a new app that has gone viral.  Its called Huanshi LTD., "My Idol." This app is completely fantastic for us creative minds, or if you want to tear up from laughter.  In this app you take your picture, and it generates a complete likeness of your face. The likeness is very scary to say the least!   "My Idol" is all in Chinese, so it takes a few minutes of getting used to.  Once I figured it out, the sky was the limit.  I just had to create our whole family!


Ashley with Heart Hands
Ashley
Norah with Lollipop
N with Lollipop
B with Ball
B with Ball
Hubby with Gun
Hubby

My mantra all weekend was "My Mind is Blown!"  Just too much inspiration for one to handle.  The world that surrounds us contains so many things that could inspire.  If you are willing to look, inspiration will reveal itself.  What about your surroundings inspire you?  How do you use that in your daily lives?


Thursday, April 23, 2015

Citra-Solv Paintings

Into the World of Metals

After completing the sewing challenge, I decided I needed a serious break! Now I have an urge to get out my paints and do a little painting. Honestly, its been a very long time since my art table has seen any paint. Its about time I change that!  For these paintings I've decided to use the photos from my cabin experience from the previous post, "Cabin Fever."

Several weeks ago I created some wonderful pages using a National Geographic magazine and Citra-Solv which is a natural cleaner you can find at any health food stores like Whole Foods.  The Citra-Solv dissolves the ink on each page to create a marbleized effect. If you want to see how this works, head on over to my fellow blogger and artist, Jenny Ann Artist, (www.jennyannartist.blogspot.com) who has just posted a great tutorial on this very subject.


I have a whole magazine full of marbleized paper, so going through them was sort of a challenge to figure out which one would work best with each photograph.  I finally picked three to go with the photographs that I wanted to paint. Since this paper was glossy, the best medium to use was acrylic ink. This stuff is amazing! It can be used like watercolor and can be layered with light washes. When used like watercolor, the inks can be watered down to become transparent.  This transparency allows for the texture of the paper to bleed through. So here we go!


The start of a pencil and ink drawing on marbleized paper.

This is a new medium for me, so I'm continuously trying to find what works.  The first thing I like to do is get my drawing down on paper.  I've learned that pencil is very hard to see on this paper, so I'm trying to become brave by drawing with pens. They are slightly erasable, so if a mistake is made it can be erased. If I have to erase, I rub lightly with a kneaded eraser. This eraser works best because it won't rub the paper and ink off when erased lightly. Now to paint!


Dark values added.
 

Medium and Light values added.
 

Highlights, and rust color added to the metal.
 
When adding in the ink, working in light layers worked the best to get the transparency I wanted. With this painting I first added in the deep shadows because there were a lot.  When painting the object, I painted in the dark values very lightly by watering them down and layering them.  This keeps the shadows from getting too dark to quickly. The medium values were painted once the shadows were achieved. The light values and extreme highlights were painted last. I had forgotten when I started these paintings that trying to create metals on a flat surface is difficult.  All three paintings have metals, so I'm really in for a treat.

I hope that you try this new medium that I have been experimenting with.  When creating these pages no two are alike. You will be amazed by what is created when Citra-Solv and National Geographics collide.  Happy Painting!


Monday, April 20, 2015

Seven Day Sewing Challenge is FINISHED!

Holy HEMLINE, Batman!


I have been sewing like a mad lady these past seven days. Phew! I'm glad the madness is over.  Since my last post I have finished all of the hems on seven out of the eight kimonos.  The last Kimono was fully lined, so it took a little bit longer to finish. To me hemming is probably one of the easiest parts about sewing. You just fold and pen your fabric, press, and sew a straight line until the fabric ends.  I always press my fabric first before I sew to ensure it doesn't crawl around under the presser foot. This leads to a straighter stitch.  Now on to an example of how I put together a hem.

Fold right side of the fabric in and pin. I used a seam gauge to help ensure that my fabric was even all the way around. (If you are a Sewing Newbie, a seam gauge is a mini metal ruler with a mini lever that moves up and down to help determine how wide the seam is.)

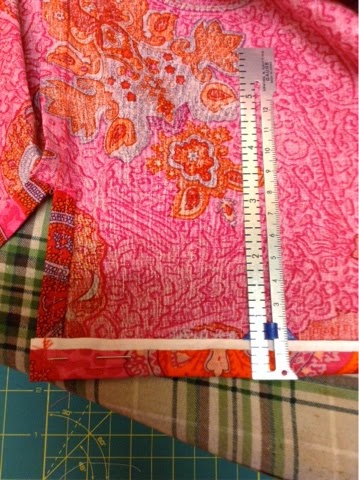
Seam gauge helps find seam allowance.
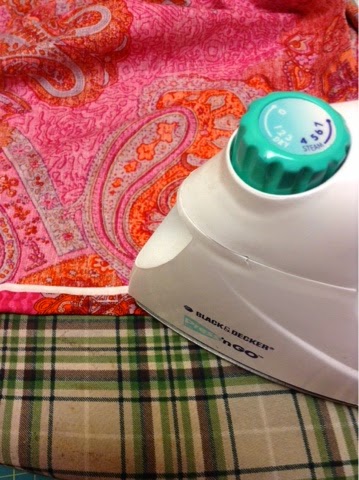
Pressing Hem down.

Once everything is folded once, fold a second time and pin.  This brings the raw edges in so fraying doesn't happen. Remember strings are a Nuisance!  Make sure to iron the seam down before taking it to the sewing machine. 

Folding Hem again to be pinned.


Finally, sew your little heart out, clip your strings, press with iron, and DONE! 
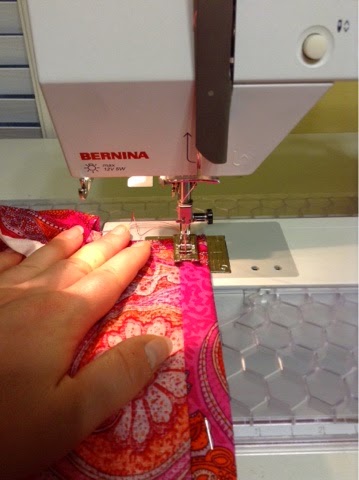
Sew like a CHAMP!
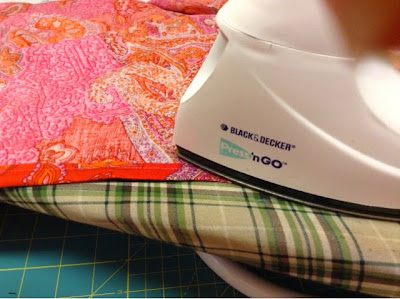
Iron 'til its AWESOME!
Now on to view some of the items that I worked so hard on these last seven days. 

Floral Hawaiian Origami Kimono Wrap Jacket

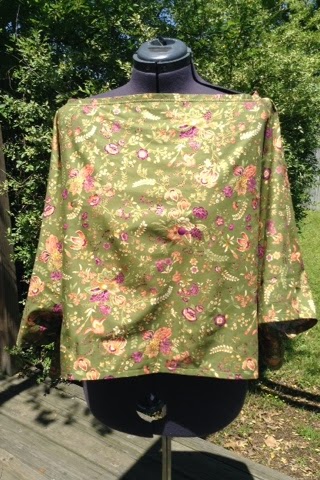
Boat Neck Cropped Kimono

Mint Origami Kimono Wrap Jacket


If you enjoy what you see, head on over to my Etsy Shop. I've added eight kimono jackets and tops, plus a bonus, FREE shipping!  I want to thank you for hanging in with me these last seven days. Its been a roller coaster rid with frills in the end.  I'm a serious scaredy cat when it comes to the real deal, but this was at least a descent ride.


Thursday, April 16, 2015

Seven Day Sewing Challenge Cont...

Babbling Bias Tape 

There are many ways to finish a seam, for instance, trim, ribbon, and bias tape to name a few.  For some of the kimonos I used ribbon to line the seam around the neckline.  This helped the seam lay flat and weight the neckline so that it wouldn't float away while being worn.  The neckline on the open jackets are rounded, so this makes it hard to get a flat seam when the fabric is turned under.

OK, so let's add the ribbon to the raw edges of the neckline.  First, I placed the ribbon shiny side down to the patterned edge or right side of the fabric.  Then, I sewed 1/4" from the edge.  As you can see from the photo my presser foot matches up with the edge of the fabric.


After I finished sewing the ribbon on, I took it to the iron.  Cover with a press cloth so you don't scorch the ribbon. Press until it lays flat. Then turn the ribbon to the back and press on the joined seam. Pin the ribbon down so that it stays in place when sewn. 


Finally, head back to your machine. I like to sew on the right side of the fabric with the satin ribbon underneath. This keeps the ribbon and rayon fabric stable, so it won't move all over the place when sewn.  


This is one way to finish your seam so that it looks professional.  I wanted to include a tutorial on bias tape in this post, but after I made a diagram in Photoshop, it looked WAY TOO COMPLICATED! Even I had trouble following my drawing. No Bueno!  When that happens, it's time to give up the pin and head over to YouTube.  I always find that since I am a visual learner a video always helps when learning something new, so I compiled a few places that will help you in your journey of creating bias tape.

YouTube Video Tutorials

Blog Tutorials


I hope this was super informative and helpful.  Check back next time for the results of my Seven Day Sewing Challenge. Sadly its coming to an end.  Some pretty fantastic stuff headed your way.  Happy Sewing!


Wednesday, April 15, 2015

Seven Day Sewing Challenge Continued...

Day 3

Side Seams and Necklines


Today is day three of my seven day sewing challenge.  You're probably wondering what happened to day one and two. Well getting started takes a lot out of you, and to be honest it's really hard to take pics, post, sew, and take care of my family all at the same time.  Trying to find a happy medium is HARD!

In the past three days, I've gotten all the side seems sewn with a French seam. (If you are a Sewing Newbie, a French seam is when you sew the right sides together, press with iron, then turn the seams inside out so that the seam will be on the inside, and sew again.)  I love doing French seams because it makes the seam look really polished in the end without having all the raw edges tucked inside. If you're anything like me, I can't stand to find threads from raw edges hanging from my clothes.  It gets to be a nuisance to clip them all the time, plus they itch or tickle at the worst time. This bright floral that I have used here is a rayon fabric.  As you can see the edges are very raw and will unravel, so a French seam is perfect for my anti-string obsession.  (If you are a Sewing Newbie, I would suggest using cottons first. They don't slip and slide as much as the slinky rayon fabrics.


After the side seam is sewn, take it to the ironing board. When you sew, it is a must to iron those seams.  If there's anything that I've learned from my Mama about sewing, ironing seams is one of the most important things about making something awesome (besides using my machine, of course.)  A seam that is not pressed is like cake without frosting.  It has zero appeal and will not look professional.  You want others to say about your garment, "Where'd you buy that?," not "Did your Mama make that for you?" (No offense to all my Mamas out there!)


Side Seam Not Pressed with Iron Side Seam Pressed with Iron Side seams Pressed Together

After sewing all the side seams, I moved on to creating the neckline.  This became time consuming because I wanted to pick the best line that would fit the shape of the fabric so that it would drape well on the body. For the short kimonos, I chose to do a boat neck and v-neck.  For the longer ones, I chose the open jacket.  This worked especially well for the long rayon prints because of the flow and drape of the fabric.

For some of the neckline seams, I chose to use bias tape.  (If you are a Sewing Newbie, bias tape is a long strip of folded fabric that is sewn to the raw edge of the garment. This makes a polished seam.) I think I might save bias tape for a later post because I could talk all day about that!  When the necklines of all my kimonos are finished, the next step is to sew the hems on the sleeves and around the bottom.  


I hope you continue with me through my Seven Day Sewing Challenge.  Check back to see my next post about bias tape.  It's going to be a doosie.  Onward we go!


Friday, April 10, 2015

Seven Day Sewing Challenge

Origami Kimono Style Jacket

Several years ago I made this origami jacket out of Pendleton Wool with a Native American print.  I happened to stumble across this fabric while visiting my sister in Atlanta.  This store was a fashion designers dream! They had oodles of goodies all around from fabric piled to the ceiling, to buttons galore. I was in heaven! The pattern was super easy, and I used bias tape for the hem.   I have worn this coat every winter since and nothing has compared to its warmth and style.


Since my return from the cabin, I have been dying to dive into the pile of cut fabric on my art table. There's a lot of work to be done to get this origami kimono style jackets and shirts finished for the spring line on my Etsy shop. I picked this type of pattern because I have a deep love for anything Asain inspired. I am also a big fan of how the pattern drapes and flows on the female body.  It all stems back to my high school days of making sculpture like lanterns and wearing baggy men's dress pants from Savers.  Blame it on the 90's I suppose.  Since I have a lot to do, I thought it would be a great idea to set up a sewing challenge. A seven day sewing challenge to be exact, so I better get to it! 


I hope you continue to join me on my seven day sewing challenge.  I think it is going to be a lot of fun.  Check back to see my progress as I plow through the pile of fabric.


Tuesday, April 7, 2015

Cabin Fever!

Spending Some Time Away From the City This Easter Weekend.

Well, I had to put my sewing on hold for the moment.  My parents and I decided to take our family to my Uncles' cabin to visit my grandmother.  We hopped in the RV and were on our way.  On his land he built a small cabin and a farm, so we took in all the nostalgia of rural life as we could for one long weekend.  We were completely off the grid with only the use of our cell phones to call home if needed.  Since we had the outdoors at our fingertips, I felt it would be a great place to get some artistic inspiration.


The cabin inside matches the rustic outside with all the antique collectibles that were used to decorate each space.  I found myself wandering around taking pictures of things that really inspired something in me.  I'm not usually the one to become inspired by rustic charm, but I was intrigued by all the intense contrast of light versus dark with interesting objects that were grouped together.  I first found this miniature set of salt and pepper shakers.  They caught my eye because of there size and unique pattern on the silver.  Next, I wandered across a metal churn attached to a cabinet.  The contrast was so intense that it reminded me of Caravaggio's work from the Baroque period.  Needless to say I love the visual drama the contrast creates.  The last picture that I was really inspired by in the cabin was a hammock that was hanging on a wood post on the porch.  Once again the contrast between the metals and organic nature caught my eye leaving the foreground slightly blurry.  Just Fabulous!


Silver Salt and Pepper Shaker Still life Photograph Still life Photograph Grinder on Shelf Photograph Still life Chains on Post Hanging Fern


Moving to the outdoors, the scenery was just beautiful. Thank goodness for the sunshine!  On my Uncles' land there are several ponds with geese, miniature horses, donkeys, and an awesome golf cart.  It was great to use to venture out in, and my kids really loved the wind in their hair.  While we were venturing out, I was on a mission for inspiration.  I really enjoyed finding interesting shadows and perspectives on objects.  The first photo was a happy accident.  The shadow of the tree really came alive and looked as if it were trying the chase my family.  The next photo was also another happy accident.  As I was getting up close to a miniature horse hiding behind some machinery, I found a slew of caterpilliers crawling all over the handle.  Amazing things happen when you least expect them.  In the last photo I just loved the perspective of the bridge while my daughter was running across it. So Amazing!


Photograph Tree Shadow Caterpillars on Machinery Photograph Photograph Norah Running on Bridge Perspective


Our last full day here, we couldn't do much outside.  The morning started off promising. By the afternoon It poured down rain until the next morning, so my kids and I snuggled up together for a long nap.  It was much needed rest since we had gone nonstop for the last couple of days.  Now to put my inspirations to action on paper. 

I challenge you to go out and find inspiration in your surroundings. You will be amazed at what you might be inspired by.