Summer is here and I just realized my swimsuit needs a little work. I bought this swimsuit last summer. Since then I've lost some weight, and the top is very loose. You're probably asking yourself, "Why doesn't she just go out and buy a new one?" Well I have bought several over the last few years, and I never felt like the fit was the best until I got this swimsuit. This was the one suit I truly enjoyed wearing, so why not fix it. The thought of trying another swimsuit did not appeal to me at all!
I've been pondering how I was going to fix it. The solution lies in the side seams. Each seam has boning sewn onto it, so trying to figure out the best way to take it in was a challenge. (Boning is a plastic strip that gives the seam support.) I played with it for a little bit, and finally decided the best way to fix it was to pull the back seams forward. This would overlap the boning giving the illusion that this new seam had been there the whole time. Now to figure out how I was going to sew it.
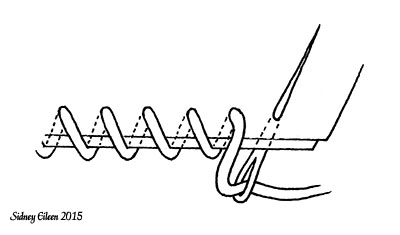
I thought the best way to sew these seams would be to hand sew them with a Blind/Slip Stitch. This stitch is mainly used for hemming or closing seams when finishing such things like pillows. This stitch is mostly invisible on a hem except for tiny tick marks made by the thread when attaching the two folds of fabric together.
Supplies needed:
Pins
Scissors
Thread
Needle
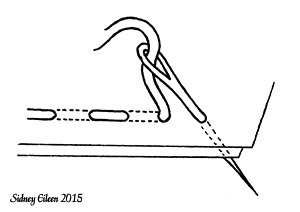
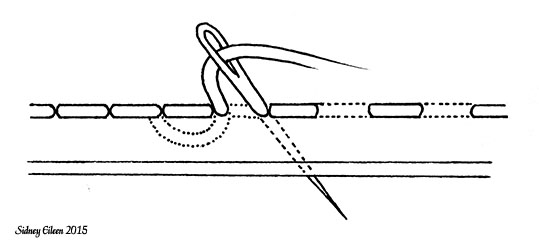
Blind/Slip Stitch
 |
| Great tutorial from Sew It Love It at http://www.sew-it-love-it.com/ladder-stitch.html |

First thing I had to do to get started was to try my swimsuit on. This helped me to visualize how much I needed to take in.

I then took it off
and pulled the back of the seam forward, overlapping the boning and the
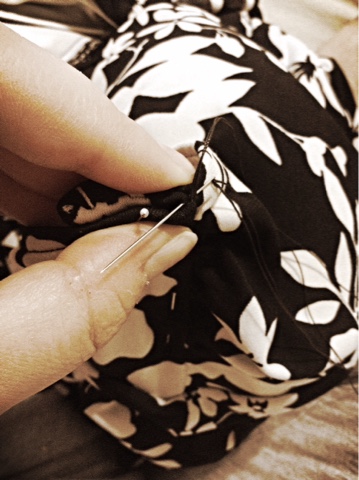
original seam. I placed pins where I thought they were needed. Once the
pins were in place, I carefully pulled the swimsuit on. This is very
tricky because I'm trying not to jab myself with a pin. It's like
playing a game to see who will win, the pins or me.

Time to get my thread ready.
For swimwear I have read that polyester thread is best. It resists all
things such as mildew, the sun, and won't deteriorate over time. The
closest thing I had to polyester thread was nylon thread. It resists
most like the polyester, but it may decay over time. The only supplies
needed here are scissors, pins, thread, and the will to get the job
done.

I cut a good length of thread measuring about two arm lengths. Then, I
threaded my needle. Usually this becomes the hardest part, but luckily I
didn't have any trouble this time. I doubled my thread, matched up the
ends, and tied my knot.
 |
| I pulled my needle through the inside of my fabric, so that the knot would be hidden. |
 |
| Now to start the Blind/Slip Stitch. |
 |
| Once the top was stitched, I moved down the side seam. |
 |
| Working on the side seam. |

When I reached the end of the side seam, I repeated the Blind/Slip
Stitch by going in the opposite direction. I wanted these seams to be as
sturdy as possible, so they could withstand the weight of water when
being at the pool.
 |
| Sewing my way back up to the top. |
Now that the side seam was finished, time to sew the overlapped fabric. This would help every seam to lay down flat. Once everything is sewn create a knot and clip your ends.
 |
Tick marks of thread on the inside of my suit.
|
 |
| All top seams sewn together. |
 |
| Finished seam. |

Voila!
After all seams a sewn, it's time to press each seam. Set the swimsuit
on an ironing board and place a pressing cloth over the seam. The
pressing cloth keeps the iron from burning the fabric. Iron each seam
down to get that professional look like it came right out of the store.
Now that my swimsuit is finished, I can head to the pool. Time for some much needed relaxation in the sun. What have you found is the best way to tailor your clothes to you?