Teaching N The Basics of Sewing.
On a day off from school during winter break, N decided during nap-time that she would cut up her play tent. She got this bright idea from watching the Hobby Kids channel on YouTube. I was furious to find that while we were napping and having quiet time that she got out the grown-up scissors to cut huge holes out of her tent. She also climbed on the counter to get the liquid glue, so that she could glue all of her pieces together to make a replica of the earth. When she was done, she came and got me out of bed. She showed me what she had done and was so excited about her creation. I WAS FURIOUS to say the least!
After I cooled down, I realized that cutting up her tent wasn't the problem. It was the fact that she went climbing again and got out the grown-up scissors which were both dangerous things to do when not being supervised. At the same time, I couldn't help but be completely proud by her creativity. It was wonderful to see her so excited by what she had created. After going through all these different emotions and having a long discussion with her that this was not an acceptable behavior to have during quiet/nap-time, I decided that she was going to have to fix her tent. She was going to get a chance to design her own tent. I explained to her that we were going to have to cut pieces of fabric to replace the ones that she had cut and sew them back together. We decided together that we would replace the large holes with a door, window, and a skylight.
The first thing I had her do was to pick out the fabric she wanted to use to sew with. She chose an orange and white polka dot and a super hero fabric that I had left over from making her brother's curtains and bed skirt. N also decided to use red embroidery thread to sew with.
The next step was to cut out the fabric into pieces for the door, window, and skylight. I eyeballed how big the door would be and cut a large rectangle. I did the same for the window. Then I cut out a circle for the roof. She wanted to have a hole in the roof for a telescope, so I cut a small circle into the center.
Once the pieces were cut, we pinned them to each section of the tent. After pinning everything together, I got the embroidery thread ready. I explained to her that we were going to be using these three stitches and showed her exactly what to do it. We used the running and double running stitch to attach the fabrics to the tent. The whip stitch was used on the raw edges of the skylight opening.
Running Stitch
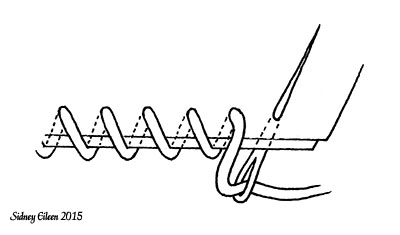
- Stitch up and down along the fabric in a line, keeping even spacing between the stitches.
The closer you make your stitches, the stronger and more stable your
seams will be. Extant medieval garments usually have between eight and
twelve stitches per inch.
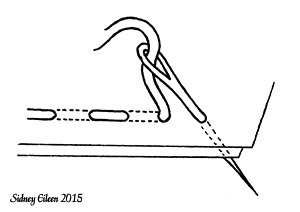
Whip Stitch
- Stitch at an angle, creating a zig-zag pattern.
The closer you make your stitches, the stronger and more stable your seam will be.
Double Running Stitch
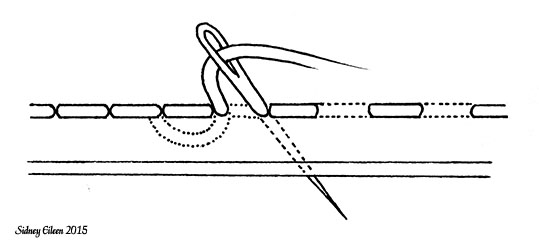
This is when you sew with a running stitch, and then sew a second
running stitch to fill in the empty spaces. In medieval sewing this is
most often used decoratively, often in a contrasting thread, anywhere
that you might use a regular running stitch. It is also sometimes used
when a seam is expected to bear extra weight or stress, and added
strength and stability is needed.
(All of this great stitching visuals and information came from
By Sidney Eileen.)
 |
| Here's N Whip Stitching the two fabrics together for the Skylight. |
 |
| N is now Whip Stitching the raw edges of the Skylight. |
 |
| N hard at work and looking fab in her headband. |
 |
| N completely focused for the moment at least. |
 |
| One excited little girl ready to play in her "new" tent. |
|
|
|
|
|
 |
| Looking at the inside of the tent. Getting ready to cut off all of the embroidery thread tales and excess fabric. |
 |
| N peeking in through the skylight hole playing Peekaboo. |
 |
| Here is the Skylight after cutting the excess fabric off and trimming all of the embroidery thread tales. |
 |
| N extremely happy with the results of her "new" tent. |
 |
| N's first chance to look out her new window. |
 |
| Close-up of N's stitching on the Skylight with a little help from Mommy, of course. |
 |
| Close-up of stitching on the window. |
 |
| Close-up of stitching on the door. |
This project took use several months. I am very proud of my little girl and myself for having the patience to stick with it. There were several times that she had trouble keeping focused, and I thought we'd never get finished. Keeping a five year old on task like this was really a challenge, and I was terrible about getting frustrated with her constant distraction. There were times I just wanted to take the needle and sew it myself, but she wouldn't have learned anything from that kind of attitude. So I tried hard to keep my cool. I think she did an awesome job, and now she has something unique and awesome to play with. She is really proud of the work she did, and now she can really show it off.
Have you ever had the opportunity to teach your child through creativity to solve a specific problem? You both might just learn more than you did before.


Cutest kid ever and what a great way to set up a teaching moment! You rock
ReplyDeleteThe whole thing was nerve wracking, but she did an awesome job! She loves her tent now more than ever and even sleeps in it. Too funny! Thank you☺️
Delete