On a day off from school during winter break, N decided during nap-time that she would cut up her play tent. She got this bright idea from watching the Hobby Kids channel on YouTube. I was furious to find that while we were napping and having quiet time that she got out the grown-up scissors to cut huge holes out of her tent. She also climbed on the counter to get the liquid glue, so that she could glue all of her pieces together to make a replica of the earth. When she was done, she came and got me out of bed. She showed me what she had done and was so excited about her creation. I WAS FURIOUS to say the least!
After I cooled down, I realized that cutting up her tent wasn't the problem. It was the fact that she went climbing again and got out the grown-up scissors which were both dangerous things to do when not being supervised. At the same time, I couldn't help but be completely proud by her creativity. It was wonderful to see her so excited by what she had created. After going through all these different emotions and having a long discussion with her that this was not an acceptable behavior to have during quiet/nap-time, I decided that she was going to have to fix her tent. She was going to get a chance to design her own tent. I explained to her that we were going to have to cut pieces of fabric to replace the ones that she had cut and sew them back together. We decided together that we would replace the large holes with a door, window, and a skylight.
The first thing I had her do was to pick out the fabric she wanted to use to sew with. She chose an orange and white polka dot and a super hero fabric that I had left over from making her brother's curtains and bed skirt. N also decided to use red embroidery thread to sew with.
The next step was to cut out the fabric into pieces for the door, window, and skylight. I eyeballed how big the door would be and cut a large rectangle. I did the same for the window. Then I cut out a circle for the roof. She wanted to have a hole in the roof for a telescope, so I cut a small circle into the center.
Once the pieces were cut, we pinned them to each section of the tent. After pinning everything together, I got the embroidery thread ready. I explained to her that we were going to be using these three stitches and showed her exactly what to do it. We used the running and double running stitch to attach the fabrics to the tent. The whip stitch was used on the raw edges of the skylight opening.
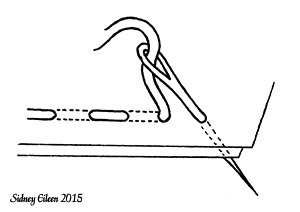
Running Stitch
Stitch up and down along the fabric in a line, keeping even spacing between the stitches.
The closer you make your stitches, the stronger and more stable your
seams will be. Extant medieval garments usually have between eight and
twelve stitches per inch.
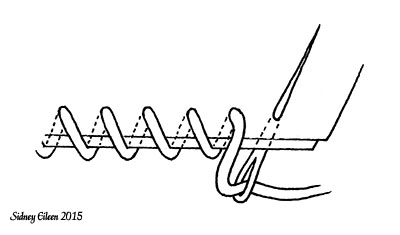
Whip Stitch
Stitch at an angle, creating a zig-zag pattern.
The closer you make your stitches, the stronger and more stable your seam will be.
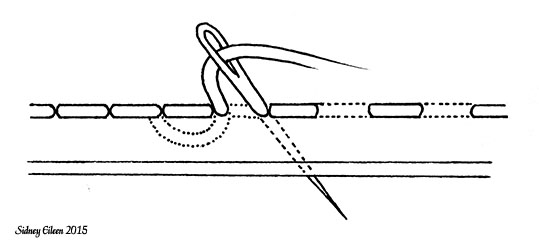
Double Running Stitch
This is when you sew with a running stitch, and then sew a second
running stitch to fill in the empty spaces. In medieval sewing this is
most often used decoratively, often in a contrasting thread, anywhere
that you might use a regular running stitch. It is also sometimes used
when a seam is expected to bear extra weight or stress, and added
strength and stability is needed.
(All of this great stitching visuals and information came from By Sidney Eileen.)
Here's N Whip Stitching the two fabrics together for the Skylight.
N is now Whip Stitching the raw edges of the Skylight.
N hard at work and looking fab in her headband.
N completely focused for the moment at least.
One excited little girl ready to play in her "new" tent.
Looking at the inside of the tent. Getting ready to cut off all of the embroidery thread tales and excess fabric.
N peeking in through the skylight hole playing Peekaboo.
Here is the Skylight after cutting the excess fabric off and trimming all of the embroidery thread tales.
N extremely happy with the results of her "new" tent.
N's first chance to look out her new window.
Close-up of N's stitching on the Skylight with a little help from Mommy, of course.
Close-up of stitching on the window.
Close-up of stitching on the door.
This project took use several months. I am very proud of my little girl and myself for having the patience to stick with it. There were several times that she had trouble keeping focused, and I thought we'd never get finished. Keeping a five year old on task like this was really a challenge, and I was terrible about getting frustrated with her constant distraction. There were times I just wanted to take the needle and sew it myself, but she wouldn't have learned anything from that kind of attitude. So I tried hard to keep my cool. I think she did an awesome job, and now she has something unique and awesome to play with. She is really proud of the work she did, and now she can really show it off.
Have you ever had the opportunity to teach your child through creativity to solve a specific problem? You both might just learn more than you did before.
Well I'm excited to say I have had another great art day with JennyAnnARtist. She had a new technique she wanted to share with me while I had one I wanted to share with her. Jenny learned that if you spray workable fixative to your Citra-Solv pages, any medium will work. This created a toothy barrier on the paper so that the glossy pages would hold more mediums applied to the surface. (If you missed my Citra-Solv tutorial, check out my post called "Citra-Solv Painting." Its a great medium with lots of possibilities!) Of course I had to try this out, so let's see what happens!
We took a couple of my Citra-Solv pages outside and laid them down onto a flat surface. Then she sprayed my pages with an even spray of workable fixative. We let it dry for a couple of minutes, and then brought them inside. Now it was time to see if the workable fixative spray would work.
With this page I saw within the ink splatter a UFO flying over land and water. I took several Permanent pens to draw my lines to create each object. They seemed to adhere to the paper a lot better due to the workable fixative. I couldn't resist drawing a cute little mouse flying the UFO.😍
Now it was time to add color to my paper. I wanted to use something other than paint, so I trieddifferent types of markers. First, I tried Prismacolor markers. The color didn't show up very well on the paper, so I moved on to the Copic markers. They worked much better, but I found you had to be careful. The Copic markers would take all the ink off of the paper if you added to much color or pressure. The black ink from the paper would adhere to the tips of the markers. I had to make sure to wipe them off onto a paper towel before using them again. This kept the color from becoming muddy.
After adding the Copic markers, I decided to add some detail with a white gel pin. This finished the UFO. Now it was time to move on to the water. I wanted to see how the acrylic ink worked on the workable fixative, so I decided to try using various blues to create the water. The acrylic stuck to the paper in a sporadic manner leaving a lot of the visual texture from the paper bleeding though. It was a nice effect for creating a natural background.
I blended a white acrylic ink where the water meets the sand. Dark blue and violet were blended into the deep dark portions of the waves. Green was added to the land to create mounds of trees. I mixed brown and white to create the color of sand. I added the sand color down the shore line between the water and trees.
The sky was the last to paint. I was curious to see how acrylic paint would work. I got out a yellow and added it to the circular globes in the sky. A bit of water was added to the yellow to create a more subtle color to make it more blend-able with the background. Violet and black were mixed together to create deeper shadows around the yellow orbs. Once that was completed, I added more detail with the white gel pen.
The workable fixative worked for most of the mediums used. Overall it worked well in applying permanent marker, acrylic paint, and Copic markers. The Prismacolor marker was the only medium I used that didn't work very well. Now I'm curious to see if oil pastels or chalk pastels would work on the workable fixative. Let the experimentation continue!
Since my last post of working with my homemade Gelli Plate, I have come to the conclusion that I was using the wrong side to print on. The side of the plate that I was using had lots of ridges and texture. I believe that it was laid out onto plastic wrap to dry. Since I had no control on how it was made, I wanted to figure out a way to fix the problem. Yes I could have flipped the Gelli Plate over, but I found that the back wasn't quite a flat surface either. Back to the instructions I go! The instructions state that if the Gelli Plate was damaged in any way to place it in a microwave. I found a flat glass dish to put it in and placed it in the microwave for a minute. I stuck around to watch closely so that nothing went wrong. Once the Gelli Plate was melted, I took it out of the microwave and laid it on the counter. There were several bubbles, so I took a toothpick and tried to pop each
one. I never thought popping bubbles would be such hard work! I had forgotten how much gelatin smells, so don't be surprised to smell something foul coming from the kitchen. When the gel was dry, I took a bendable spatula and gently separated the sides from the glass. This allowed me to pick up the gel as a whole to get it out of the glass dish. I placed the Gelli Plate back onto the cardboard surface I was keeping it on. Now to apply paint to see if it creates a better monoprint.
To begin I made sure my Gelli Plate was clean. I wiped it down with a baby wipe.
I added color by dropping dots of acrylic paint all around the plate.
I rolled out the paint with my brayer making sure to cover all the edges.
Now it was time to stamp my little heart out. I found a bamboo stamp that I thought would be good to repeat all over my plate.
I am really enjoying using black cardstock to make my prints, so here I go placing it onto the plate.
Once the paper has been pressed with the rolling of the brayer, it was
time to peel the paper off the plate very gently. For some reason a lot
of the ink was left behind on the plate. I did two points on this
plate after reheating it, and the paint sticks a lot more than before.
I'm not sure what that's all about, but there is an abundant amount of
cleanup to be had.
Print #1 Using Peacock Stamp
Print #2 Using Bamboo Stamp
I really enjoy how simple these prints turned out. They look very primitive-like. Now on to cut these prints down and add more detail. I'm glad I faced the problem head on to come up with a solution. What problems have you had (if any) while working with the Gelli Plate? Happy Printing!
I have a new found love! The Gelli Plate. It is great to use when making monoprints for creating backgrounds or fabulous pieces of art on their own. JennyAnnARtist introduced me to the Gelli Plate awhile back, but I haven't gotten a chance to experiment with it until now. She was awesome enough to give me a homemade Gelli Plate that she had received at a workshop. I had no idea how to use this, so I headed on over to YouTube for some visual inspiration. I found a couple of great videos that showed just how to create with it.
The first video I found gives a great introduction to using the Gelli Plate.
The second video I found goes more in depth on using stencils and stamping. She even stamps on muslin, which I was super excited about because I love working with fabric.
The last video I found very interesting because she makes her own stamps out of foam sheets. I just love her accent and how she calls it funky foam.
To start I went through all of my supplies to see what I had to use for creating a monoprint. I knew I didn't have hardly any stencils, but I did find that I had a lot of stamps
that Mom had given me with all the jewelry goodies months before. In the
videos they say to use the cheap craft acrylic paint and a brayer. I
had a few bottles of craft paint left over from previous projects. I guess now I'm ready to get started!
Here is my Gelli Plate all ready to go. Make sure that your plate is on a flat surface, and that you do not use sharp objects on the plate. Since this is a homemade Gelli Plate, if it gets cut for any reason, it can be heated to melting point and laid out to dry so it can be used again.
Gelli Plate, Brayer, Sponge, Acrylic Paint
I picked a few colors and put a few dots of paint onto the Gelli Plate. If there's anything that you learn quickly from the videos is to use less paint. The plate does not absorb the paint. It just lays on top waiting to be soaked up by the paper, so a little goes a long way.
Adding Paint to Gelli Paint
I rolled the brayer over the paint, first horizontally, then vertically to create a blending effect among the paint.
Using Brayer To Roll Out Paint
I found a cat stamp I had made out of funky foam awhile back. It was used to make a t-shirt for a friend's birthday. I placed the stamp on the plate and pressed down gently. The process was repeated until there were six cats stamped on the plate.
Stamping with Funky Foam Cat
Next I sponged some texture into the Gelli Plate. It's very hard to see the stamping, but it shows up beautifully when you press your paper to it to create a print.
Using Sponge To Create More Texture
In all the videos I watched, they only stuck to using white cardstock or heaving art paper. I will say there was one instance where one of the tutorials showed using a wallpaper sample. Which by the way came out pretty amazing! I wondered what black paper would look like since most of what I'd seen was white paper being used. I had several packages of black cardstock left over from a friend's wedding last year. This would give me plenty to experiment with.
Black Cardstock on Gelli Plate To Create Print
I placed my paper on top of the plate and rolled my brayer onto the back. This killed two birds with one stone. It took the excess paint off the brayer and pressed the paint to create the print on the other side. This fantastic idea came from one of the video tutorials, so you've gotta watch them.😉
First Print Created On Black Cardstock
When I was finished with the brayer, I pulled the paper gently off the plate. I was disappointed to find that my cat stencil didn't show up very well. However, I very much loved the texture. I was also intrigued by how the black paper intensified the color combinations used on the plate. This made me want to do more!
2nd Print In Process
For this next print, I came across the spider girl stencil I made of my daughter several years back. I wanted to see how this would work over using a stamp. I pressed gently into the paint with a block stamp. Then, I added the spider girl stencil, wet side up, onto the Gelli Plate. The stencil was wet from previous use as seen in the first picture below. I placed the paper on top of the stencil and rolled the brayer over the entire page to create another print. Once again I really loved the contrast of the black paper with the vibrant colors.
3rd Print, Stencil Is Dry When Printing
4th Print, Stencil, Wet Side Up, While Printing.
On this next print, I used a cardboard stencil made from some scrapbooking cut outs. I placed the stencil onto the inked plate. I then used the sponge to tap paint into the stenciled area. I repeated this process until I came across the plate. I found a stamp of birds flying and figured this would be great to stamp them flying out of the trees. I used a wide toothed comb to scratch off paint from the surface of the plate. When this was done I placed my paper onto the plate, used the brayer, then peeled the paper of gently.
5th Print, Used Tree Stencil, Wide Toothed Come, Bird Stamps
In my opinion the trees and birds came out pretty blurring, but I very much like the composition as a whole. I really enjoy the vertical lines created by the wide toothed comb.
5th Print Completed
Since watching those video tutorials, I had to experiment with printing on fabric. I used white muslin. It was a nice change of pace after using all of that black paper. I wanted to see how the prints varied from paper to textile, and from switching colors from white to black. In the video she stated that when printing on fabric the more paint the merrier. The fabric needs a lot more paint to absorb the print into the fabric. After laying down a thick layer of paint with my brayer, I sponged the plate overall, and then stamped the flying birds once again. When I was finished, I placed the fabric on top to print. I thought it would be best to use my hands to press down onto the plate instead of using the brayer. I felt the brayer would bunch the fabric in places, thus ruining the print.
Printing With White Muslin
I really like how the white muslin creates a subtle print. The colors are still vibrant but the contrast is subtle.
1st Print On Muslin
The last print I did was a repetitive stamp into the paint. It reminds me of a paisley print, which I just adore. I'm quit partial to paisleys.
Last Print Created Using Paisley Pattern
Since using this homemade Gelli Plate, I have come to the conclusion that it is great to use if you want a constant built in texture in every print. This plate if you look closely is not a flat surface. There are a lot of shallow ridges that were created from the clear plastic wrap that it was wrapped with when I received it. This already made texture can interfere with stenciling, stamping, or any process you choose to use to create a print. The Gelli Plates used in the video tutorials seem to be a very flat surface.
Now that I have tried this Gelli Plate, I would love to learn more. I will continue to experiment with the many wonders of the Gelli Plate. If you have any techniques that you would like to share, please comment below. Happy Printing!
It has been awhile since I've drawn in my art journal. It's funny how life can just get away from you. Sometimes it keeps you from doing the things you truly enjoy. So now I'm trying to get back on the wagon and finish what I've started by continuing to fill up my art journal.
Since spring began, this loud noise has roared through our city like a freight train. The constant hum has become so deafening that people all around have been calling the police. They truly believe that UFOs have invaded our city! While their imaginations run wild, we need to get to the heart of the noise. The cicada. Lately nature has been calling to me like the hum of the cicada. I've had several visitors from nature recently, such as a hummingbird at my window, a garden snake in my garage, and the cicada who sat down beside me on the park bench. While being outside with the kids after school, a cicada sat down right beside me. He flew off after giving me a long silent stare. Makes you wonder what these creatures are thinking about or was he just posing for the camera. Once again nature inspires the artist within.
Cicada Sitting Next to Me on a Park Bench.
I started drawing the Cicada with a pen. I was really tired of doing black and white, so I decided to add some color with color pencil and Sharpie. Adding color with color pencil didn't really show up well on the water-colored paper, so I added the same color Sharpie over the color pencil. I used the silver Sharpie to create the highlights among the wings and body. I really need to invest in some gel pens. They would add bright color to any surface. Oh well, this will work for now.
When I was finished with the cicada, I felt the background was lacking. I decided to repeat the pattern within the wings. I like how the repetition created some visual texture. Once again I layered the Sharpie onto the colored pencil.
Cicada
Cicada's Wing Detail
Cicada Head Detail.
I am really enjoying drawing from nature. I do believe this is the first year I have gotten some color on this pale skin before summer has started. Lots of inspiration can be had when you spend some time out in your surroundings. I challenge you to do the same.

 This is when you sew with a running stitch, and then sew a second
running stitch to fill in the empty spaces. In medieval sewing this is
most often used decoratively, often in a contrasting thread, anywhere
that you might use a regular running stitch. It is also sometimes used
when a seam is expected to bear extra weight or stress, and added
strength and stability is needed.
This is when you sew with a running stitch, and then sew a second
running stitch to fill in the empty spaces. In medieval sewing this is
most often used decoratively, often in a contrasting thread, anywhere
that you might use a regular running stitch. It is also sometimes used
when a seam is expected to bear extra weight or stress, and added
strength and stability is needed. 


