Wednesday, May 13, 2015

First Use of My Art Journal

I Found A Troll Inside


I am trying very hard to utilize my new art journal.  I'm not sure why it is so hard for me to dive right in and just draw something. Anything on a page.  I really think that fear is my biggest problem.  Why is a sheet of paper so intimidating?!

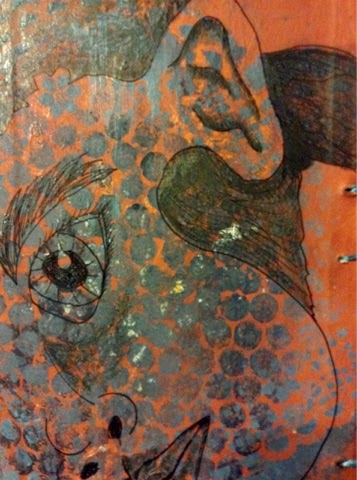
After taking a look at my first page, I found a random hair that got caught amongst the paint and gel medium.  It was in the shape of an ear, so I took my drawing from there. I started with pen and then moved to pencil.  I had forgotten that permanent pen does not work well on acrylic. It looses its ink mid drawing.  I finished drawing the ear, which was very oddly shaped, and decided to take it further to create something whimsical. After I finished the head, I really didn't want to cut the hair off at the spine, so I kept going across the page following the movement of the texture.


Face Drawn Inside Cover

Hair Drawn on Front Page

Troll Completed!


I am very proud to say that I have completed my first drawing in my art journal.  I am going to challenge myself to continue on this path to finish this, and to conquer my fear of that blank page.  I challenge you to do the same whether its an art journal or something else you are working towards.


Tuesday, May 12, 2015

Mixed Media Art Journal Tutorial

Time To Get My Hands Dirty!


Since my last post about art journaling, I had the chance to get together again with one of my favorite people and Artists, JennyAnnArtist (www.jennyannartist.blogspot.com), who, like me, is trying to figure out this whole art journaling thing.  I found out that she, like myself, has trouble using sketchbooks or art journals to express ideas. She also finds it hard to work things out onto paper before hand.

For weeks we have been talking about creating an art journal.  We found that Alisa Burke created an awesome video tutorial on just this very subject! You should really check out her amazing video tutorials and artwork.  I've added her blog to my blog list. I know you're excited, so click on it! Her video tutorial was completely inspiring, so we decided it was high time that we sit down and make one. JennyAnnArtist also had some great techniques that she wanted to share with me on using mixed media gel medium. This was all new to me, so I was excited to get started.  

Supplies We Used:

  • Hardback books  (Years ago I had collected several hardback books from the library that they were going to discard.  I snagged a few just for this very occasion!)
  • Razor blade
  • Acrylic paint
  • Watercolor paint, pencils, crayons
  • Gouache paint (like watercolor but opaque)
  • Brushes in several sizes
  • Cup with water
  • Watercolor paper
  • Scrapbook paper
  • Liquitex Gel Medium
  • Paper towels
  • Stamps, stencils, doilies
  • Brayer
  • Gel pens
  • Washy tape
  • Ribbon
  • Hammer & Nail
  • Ruler
  • Sharpies
  • Scissors
  • Hole punch
  • Tapestry needle
  • Apron or Over-sized Tee 

I know this list of supplies looks intimidating, and you're probably saying to yourself, "Aren't art supplies expensive?" Well here's my suggestion for that.  I would head to your local craft or drugstore and take a look at their Crayola section.  They have a wide variety of paint and paper for sale.  I would also suggest looking at Hobby Lobby or Micheal's weekly add or 40% off coupon. They normally have great sales on their art supplies.  I hope this has helped the intimidation and anxiety subside.

To get started, we had to cut the covers off the hardback books with a razor blade.  Then, we painted both sides with acrylic paint.  While the paint was drying, we tore or cut scrapbook paper to add some visual texture to each cover.  We applied Liquitex gel medium to the back of the scrapbook paper, placed it on the cover like glue, and then added more to the top using our fingers. This helps the paper to lay flat and removes any bubbles or gaps.  Liquitex gel medium is quit messy, so be prepared to wash your hands a lot! We did not use a brush for this process because brush strokes will be left behind. Once the scrapbook paper was in place another light layer of paint was added.

    Beginnings of Front Cover

Washy tape was used to add a title to the cover of my Art journal.  I used alphabet stamps with acrylic paint to create the letters. I felt the washy tape needed something extra, so I added a pattern around the edges. I recreated the pattern found in the large circles on the scrapbook paper using a Sharpie. White gel pens were added to the lettering and patterns to create contrast.


Adding Details to Front Cover


The white gel pens were also used to add extra detail to the front and back covers.


Adding White Detail to Front Cover

Adding White Detail to Back Cover


When the front and back covers were finished to my liking, it was time to add holes, so everything could be put together in the end.  I placed the ruler to the side of the front cover and added three dots with my black Sharpie.  This was where I was going to hammer a nail into each dot to create the holes needed to attach everything together.


Putting Dots For The Binding Holes


Find a flat surface and hammer away.  Make sure not to hammer to far, so that you won't put holes in your floors.  I think hammering outside on the sidewalk would be a better option, but when you're creating you neglect to think of such things.


Hammer Time!


Once the holes were made, I decided to add some sort of pattern to the inside of each cover. I painted acrylic paint using a brush to the bubble wrap and placed it onto the inside of the front and back cover.  Then I peeled the bubble wrap off to find a great polka dot pattern.


Bubble Wrap Printing

Ta Da!


I didn't want just a plain background for the inside cover, so I added some stenciling with acrylic paint and a heart doily. I placed the doily where I wanted it.  Then I used a tapping motion with my brush to create a stenciled effect.  The heart was then peeled off carefully, so that it wouldn't tear to pieces. Remember, wet paper is fragile paper!


Heart Doily Printing

Ta Da!


Now to prepare the paper for the inside of the art journal. The first two sheets of watercolor paper were printed with acrylic paint.  I used a brayer, bubble wrap, and watered down acrylic on both sides. When I was finished, I laid them out to dry.


Adding Acrylic Paint to Inner Pages


On to getting the rest of the paper ready.  There are loads of techniques that can be used with watercolor, such as, wet on wet, applying with brayer, and stencil to name a few.  


Getting Ready to Add Watercolor Inner Pages


Before we could put anything together, there was some finishing up to do, and laying everything out to dry.


Pages Drying


Once dried, gather all of your pages together, fold in the middle, and stack one on top of another like a book.


Preparing Pages to be Punched


Place front book cover on top of the folded pages.  Make sure to align edges of front cover to your pages.  Mark holes with a Sharpie.  Then create holes with a hole punch.


Heart Hole Punches Are the Best!


To bind my art journal together, I decided to use ribbon.  I cut my ribbon to length, threaded it through the tapestry needle, and pushed the ribbon through the holes with the needle. To finish I tied a knot at the end to keep my journal from falling apart. Trim the excess ribbon with scissors.  Voila, my first art journal is complete!


Ribbon Binding

And Done!


I have now found that art journals are a lot of fun and freeing to make.  There is not a lot of thought put into the process, especially when creating each inner page.  Things work out better when you don't put to much thought into it.  Now I have a great way to create smaller pieces of art while figuring out this whole art journal thing.  I would love to hear how you use and create your own art  journal.  If you have any other ideas about creating art journals, please leave a comment below.


Friday, May 8, 2015

Art Journaling

And The Art of Procrastination


I think I should change my name to Procrastination because that's what I've done all this week.  I'm not sure if it's an artists' way, but it seems to be my way of doing things.  For some reason I feel more creative at the last minute.  Call it a rush to the finish line, or maybe it's the fear of failure. That I won't be able to accept each piece once it's finished. Whatever this thing is, I need to find a better way of dealing with it, so that I might be more productive.

As an Artist, I have never been one to journal my ideas. Once an idea manifests, it runs constantly in my head like a reel of tape.  Whoa, man that's really dating my age there!  Sometimes I try to write down my ideas in words in small segments just to get the tape to stop reeling.  A lot of Artists say that their art journal really helps them to sort out ideas and to come up with new ones.  I'm not one to poo on their parade, so maybe I should give art journaling another try. 

Now on to putting my ideas down in my art journal. My first two ideas were inspired by a couple of 36Crazyfists songs from their album "A Snow Capped Romance".  They played here in Little Rock last month at Juanita's.  The show was awesome and completely inspiring! "Skin and Atmosphere" was the first song I was drawn to because of the lyrics.  The words just kind of hit home for me with some feelings I've been dealing with lately.


Rename My Heart The Calender.


The second song that I was drawn to was "Installing the Catheter." When I was in Las Vegas in February, I went to a Chihuly exhibit.  I found this vase that Chihuly had created with an impression of a human's face on the front.  I'm not sure if he made this intentional or by accident, but if you look carefully at the top you will see the portrait.  Needless to say I was intrigued.  This vase, along with the song lyrics, inspired this next journal entry.


Chihuly Vase


Heading For The Bottle of You.


My last entry into my art journal was created from the manifestation of ideas and letting the tapes reel in my head.  I decided to depict the reel of tape with a film camera reel.  I really love antique gadgets because they have so much character.  This type of film camera reel really pairs well with my profile.


Reels Are Turning.


Now to add these images to paper.  I have decided to use the textile paper that I created in the last post.  The textile paper has been cut down into sizes that I thought I might want to work with.  I used my rotary cutter, ruler, and self healing matte to get the job done.  Most of the pieces came out to be 8x10, but there is also a 12x18 and a 16x24.  I also cut several odd shaped pieces, as well, just because my fabric was oddly shaped to begin with. 


Cutting Textile Paper.


Textile Paper Ready to Use.


Now that my textile paper is ready to use, I can finally add my images from my art journal.  How do you prepare your ideas for creating?  Do you let the tapes reel, or do you have a better way of managing your creativity? Check back next time for the finished pieces and my journey with art journaling.


Monday, May 4, 2015

Textile Paper Tutorial

AKA Fabric Paper


One of my favorite mediums that I love to work with is textile paper.  It's so versatile that it can be painted, embroidered, collaged, ext. I can also take this paper to my sewing machine and sew right on it without tearing the paper.  The possibilities are endless!  The only drawback to textile paper is the drying time.  The process of creating textile paper takes a couple of days to prepare so make sure that you allow for that time.  Let's start gluing!


Trash Bag Taped to Table


When working with textile paper, it gets really messy.  Your workspace should be covered with a protective layer of some sort, whether its a garbage bag or my favorite, wax paper.  I really like working with wax paper because it keeps the fabric in place when it's wet.  I had to opt for the good ole garbage bag because I realized when getting my supplies together that I ran out. Bummer!  No worries though because taping my garbage bag to the table will work just fine.


Cutting Citra-Solv Paper into Strips


Before I can do anything, I have to get my paper together that I am going to apply to the fabric. Normally I use tissue paper, in which I tear it, and layer it onto the fabric. Since I had more than half of a National Geographic magazine left from the Citra-Solve post, I decided to go that route.  With that decision made, I cut my pages into one inch strips.  Now that all the strips are cut, it's time to prepare the fabric.


Materials Needed for Textile Paper


For the textile paper, you will need muslin in any color.  It normally comes in white or natural, so either one is fine.  The glue I like to use is Tacky Glue, but I also have a small bottle of ModPodge sealant for a backup glue just in case I run out.  I find that foam brushes work the best in applying the glue because they won't leave streaks.  Lastly, I have a designated plastic bowl with a lid to keep my glue mixture in.  The lid is useful for when I have leftover glue.  I can put the lid on and save it for the next time around.  Otherwise the glue will dry out, and sadly it will be wasted.


Glue Added to Container

Pour the glue into the plastic container.  A large amount should be added to make enough to cover this very large piece. Stopping and making more glue solution while you're working is such a hassle. That's why a large amount is needed at the beginning.  If you make too much, put the lid on the container, and save for a later date.  Now it's time to add the water.  Normally I take my container to the sink to fill it up, but for this tutorial I thought a measuring cup was in order. I filled the cup full to equal two cups of water.  Not all of the water will be used, but it's nice to have extra just in case.


Water Added to the Glue


Once all the glue is in the container, pour the water in.  I used about a cup and a half.  Normally I'm not this precise, but I wanted my instructions to be crystal clear.  It's really your preference on how runny or thick you want your glue mixture. I find it to easier to spread if it's on the runny side.  It's not a complete science. Just do what you feel is right for your project.  Now it's time to mix!


Muslin Placed into Glue Mixture


Once the glue mixture is combined, place the muslin in the bowl.  Saturate the muslin so that it is drenched in the glue mixture.  Ring out the excess and place on the table.


Muslin Laid Flat onto Workspace


Pull the muslin apart and lay flat on the table.  Now we are ready to create!


Adding Glue to Strips

Dip the foam brush into the glue mixture.  Then sweep the glue across the back of the paper. Place the paper where you want to begin.  Then go over the top of the paper with more glue. This helps to seal the paper down to the fabric and get rid of any bubbles or gaps.  


Starting Background Design


Repeat process until the muslin is covered and you are satisfied with the design.  If you don't like where your design is going, it can be changed.  Carefully pull the paper up so that it won't tear and place the paper where you want it to go. Nothing is set in stone unless it's dry.  Make changes if needed and then let dry.


Textile Paper Complete!


Textile paper is an awesome medium that I have placed at the top of my arsenal of art techniques.  What medium do you put at the top of your list?  Why does it speak so strongly to you?  I would love to hear from you.  Check back later to find out what is in store for this amazing background. 


Sunday, May 3, 2015

DIY Anthropologie Necklace

Cimbalom Pendent Necklace


This week has been super hard to get through because my kids and I were all sick.  Needless to say I didn't get anything done, so now I'm playing catchup this weekend.  Since my Mom gave me a ton of jewelry making supplies when they were here last, it's time to put it to good use.  


Cimbalom Pendent Necklace: Anthropologie


I picked the Cimbalom Pendent Necklace because I really liked the simplicity of the design.  It's straight lines and use of beading intrigued me. Now on to the tutorial! 


Supplies for Necklace


Here is what you will need, several pairs of jewelry pliers (wire cutters and needle nose), beads, chain, a clasp, eye pins, jump rings, and a felt sheet.  When buying chain for this necklace, make sure that you buy really good quality.  I found out the hard way that a cheap chain will fall apart in the middle of putting your pieces together. Very frustrating to say the least!


Chains Cut and Beads


Measure chain to the length of your front and cut the chain into two equal lengths.  The third length should be shorter, and it will be used to end the necklace. I also gathered all of the beads to be used and placed them in a plastic pan, so that they would stay in one place.  Any surface with a lip around the edges will do, such as, a shallow plastic dish or a paper plate.  Use what is accessible to you.


Eye Pin Through Chain.


Start by gathering all the eye pins together onto a piece of felt. I separated the eye pins to create the pattern for the beads.   Then place one of the longer length chains in front of you.  Before placing the eye pin through the chain, add a seed bead onto to it. Then add an eye pin through the chain where you want your beads to start.  This is going to be different for everyone depending on where the top of your chest lies.  


Beads added to eye pin.


Once the eye pin is in place, beads can be added.  Smaller beads work better than larger ones because the eye pins will be placed so close together. 


Beading Finished on the First Chain.

After each eye pin is added, loop the ends with the needle nose pliers so that the beads stay in place.  The extra chain added at the bottom of the necklace should be cut to match the main chain that holds the beads together. 


Adding Beads Through Second Chain Length.


Now it is time to add each eye pin through the second chain length.  I pinned the chain down to the felt sheet, so that it wouldn't slit and slide. I cut off the loop I created on the eye pins with the needle nose pliers.  If the extra wire wasn't cut, there would be a continuous gap in the beads.  You want the beads to be tight on the chain.  After the extra wire is cut, place the eye pin through the chain.  The eye pin will have to be bent slightly to get it through the chain.  Once the eye pin is through the chain, add a seed bead, and curl the rest of the wire with needle nose pliers.  Make sure to bend back the eye pin so that it is straight between each chain. Continue until all of the eye pins are added.


Beads Added to Both Chains.


Now that all beads are added to both chains, finish by adding the last chain with jump rings, some extra beads on eye pins, and a clasp.  


Opening a Jump Ring.


To open a jump ring, use the needle nose pliers to pull the opening towards you.  This will keep the shape of the ring once it is connected to the chain and closed with the pliers.


Necklace Complete!


Now that your necklace is finished, go ROCK your new look!  Share images of your finished product below in the comments section.  Happy Creating!